

Transform your child's room into a vibrant wonderland with these fun DIY projects. Create cheerful wall art using handprints or paper butterflies, and breathe new life into old furniture with bold colors and playful knobs. Craft animal-shaped fabric bins or cloud shelves for whimsical storage, and add magic with cloud-shaped lamps or glow-in-the-dark stars. Personalize the space with hand-painted curtains or felt name banners, and keep things tidy with colorful hanging pockets or repurposed crates. These projects blend creativity with practicality, turning your little one's room into a cozy, imaginative haven. Discover how these simple ideas can spark joy and inspire endless possibilities in your child's space.
Key Takeaways
- Create a colorful hand-print tree on canvas using washable paint for cheerful wall art.
- Revitalize old furniture with bold colors, playful knobs, and stencils for unique bedroom pieces.
- Craft animal-shaped fabric bins and cloud-shaped wall shelves for fun, functional storage solutions.
- Design a cloud-shaped lamp with cotton batting and LED lights for magical room ambiance.
- Personalize the space with hand-painted curtains and stuffed animal pillows shaped like pets.
Cheerful Wall Art Creations
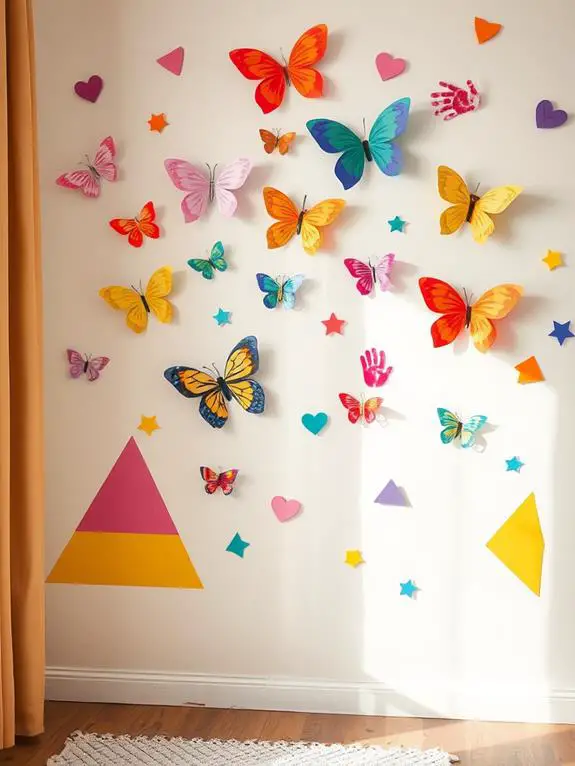
Three easy wall art projects can instantly brighten up your child's room. First, try creating a colorful hand-print tree. Dip your little one's hands in washable paint and press them onto a canvas, forming branches. It's a heartwarming keepsake that grows with your child. Next, craft a whimsical paper butterfly mobile. Cut butterfly shapes from colorful paper, string them on fishing line, and hang them from a wooden hoop. Watch as they flutter gently in the breeze, bringing a touch of magic to the space. These projects are perfect for adding a cozy winter atmosphere to your child's room, even during the colder months. Finally, design a personalized name banner using fabric scraps and wooden letters. Paint the letters in vibrant hues, then attach fabric pennants between them. This charming addition adds a pop of color and makes your child feel special. These projects will transform their room into a cozy, cheerful haven.
Upcycled Furniture Makeovers
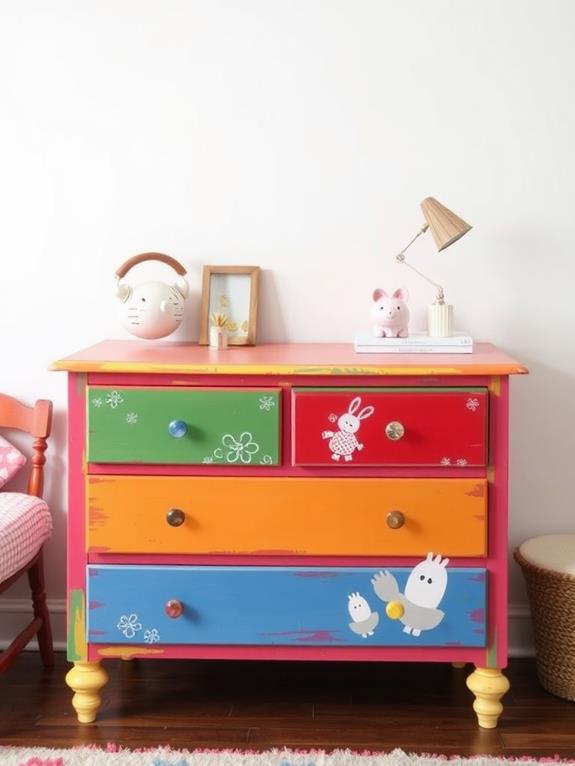
Once you've tackled wall art, it's time to breathe new life into old furniture. That tired dresser or plain bookshelf can become a whimsical centerpiece in your child's room with a little creativity. Start by sanding the piece to create a smooth surface, then let your imagination run wild. Bold, primary colors work wonders for younger kids, while teens might prefer softer pastels or sleek metallics. Don't be afraid to mix and match! Add playful knobs shaped like animals or stars, or use stencils to create fun patterns. For a personal touch, let your child help choose colors or add their handprints. Consider incorporating fall secret garden elements for a cozy, enchanting atmosphere. Remember, imperfections add character, so embrace the DIY spirit. With each brushstroke, you're not just transforming furniture; you're creating memories and a space that grows with your child.
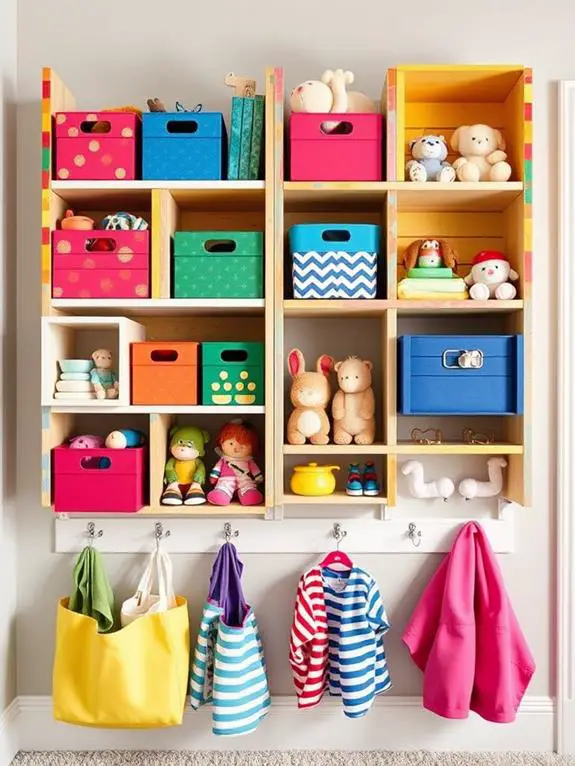
Playful Storage Solutions
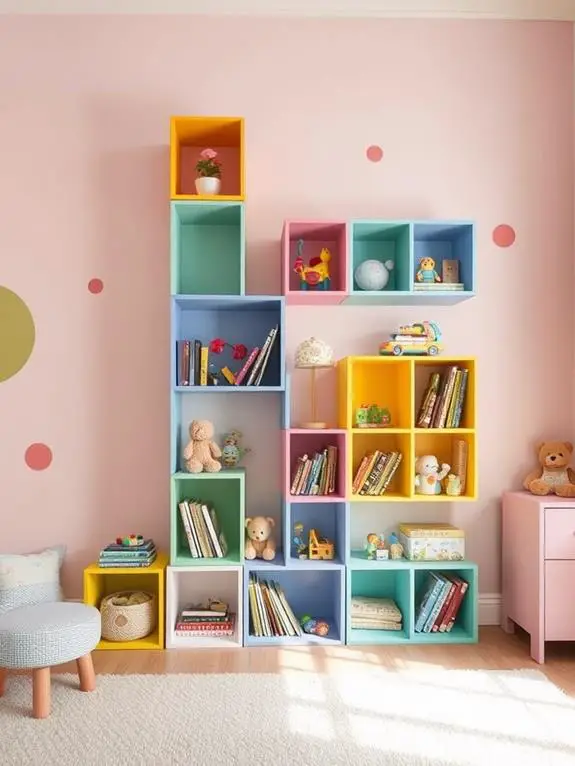
Now that you've revamped the furniture, let's tackle the ever-present challenge of keeping a kid's room tidy. Playful storage solutions can make organizing fun and easy for your little ones. Imagine a room where everything has its place, and clean-up time becomes an adventure rather than a chore. Just as you might transform your patio for spring, you can breathe new life into your child's room with fresh storage ideas that double as decor.
Consider these whimsical storage ideas:
- Colorful fabric bins shaped like animals
- Wall-mounted baskets that look like cloud shelves
- A toy chest disguised as a treasure chest
- Hanging organizers with pockets shaped like flowers
- Bookshelves designed to look like trees
These creative storage options not only keep the room neat but also add to its charm. You'll love how these solutions blend seamlessly with your child's decor while encouraging them to tidy up. With a mix of practicality and imagination, you can create a space that's both organized and inspiring.
Whimsical Lighting Projects

Lighting can transform a child's room from ordinary to magical. With a few simple DIY projects, you'll create a whimsical atmosphere that'll spark your little one's imagination. Try crafting a cloud-shaped lamp using cotton batting and LED lights, giving the illusion of a fluffy, glowing cloud floating above. For a starry night effect, paint glow-in-the-dark stars on lampshades or string fairy lights across the ceiling. While working on these projects, keep in mind that site improvements may temporarily limit access to online tutorials, so gather your resources beforehand. Don't forget the charm of shadow puppets – cut fun shapes from cardstock and attach them to a plain lampshade for enchanting bedtime stories. You can also repurpose old jars into twinkling lanterns by adding battery-operated tea lights and colorful tissue paper. These creative lighting ideas will not only brighten up the room but also create a cozy, dreamy space for your child to enjoy day and night.
Personalized Textile Crafts
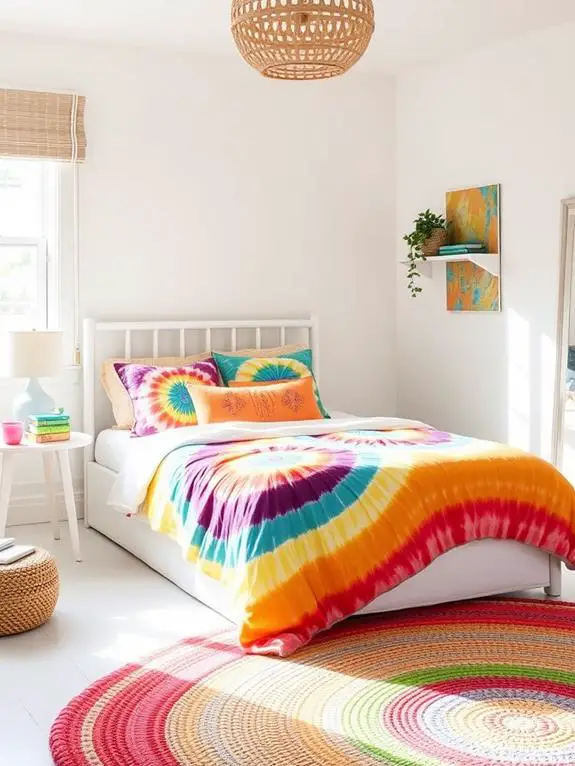
Textile crafts offer endless possibilities for personalizing your child's room. You'll love creating unique pieces that reflect your little one's personality and interests. From cozy quilts to playful pillows, these handmade treasures will make the space feel truly special. Spring-inspired hallway decor ideas can also be adapted for children's rooms, adding a fresh and vibrant touch to their personal space. Let's explore some delightful textile projects you can tackle together:
- Hand-painted curtains with your child's favorite characters
- A name banner made from colorful felt letters
- Soft, stuffed animal pillows shaped like their beloved pets
- A patchwork growth chart using fabric scraps
- A personalized doorknob hanger with their name and favorite colors
These projects aren't just decorative; they're a way to bond with your child and create lasting memories. As you work side by side, you'll infuse the room with love and creativity. The result? A warm, inviting space that nurtures your child's imagination and makes them feel right at home.
DIY Organizational Helpers
Organization is key to keeping a child's room tidy and functional. Creating DIY organizational helpers can be a fun and rewarding project for both you and your little one. Start with colorful hanging storage pockets made from fabric scraps, perfect for stashing small toys and treasures. Transform old wooden crates into charming book nooks by painting them in vibrant hues and stacking them creatively. Repurpose tin cans as whimsical pencil holders, wrapping them in patterned paper or felt for a cozy touch. While site maintenance may temporarily limit access to online inspiration, this downtime provides an opportunity to brainstorm unique ideas with your child. For a playful twist on clothing storage, attach painted clothespins to a wooden board, creating an easy-to-use system for hanging outfits. Don't forget about under-bed space – roll-out drawers made from sturdy cardboard boxes can keep seasonal items neatly tucked away. These simple yet effective solutions will help your child's room stay organized and inviting.
Frequently Asked Questions
How Can I Involve My Children in the DIY Process Safely?
You can involve your children in DIY projects safely by starting with age-appropriate tasks. Let them help with painting using non-toxic paints and child-sized brushes. They can assist in measuring and marking areas for decoration. Encourage them to pick out fabrics or colors for their room. Always supervise and teach proper tool usage. For younger kids, focus on simpler tasks like sticking decals or arranging decorative items. Remember to make it fun and praise their efforts, fostering a sense of pride in their contributions.
What Are Some Budget-Friendly Alternatives for Expensive Craft Materials?
You might think crafting on a budget means sacrificing quality, but that's not true! You'll find plenty of affordable alternatives right at home. Transform old magazines into colorful collages, or repurpose cardboard boxes into sturdy sculptures. Nature offers a treasure trove of materials: collect pebbles, leaves, and twigs for rustic art projects. Don't forget about household items like paper plates, cotton balls, and pasta shapes. With a little creativity, you'll discover endless possibilities for budget-friendly crafting that's just as fun and rewarding.
How Do I Protect DIY Projects From Wear and Tear?
To protect your DIY projects from wear and tear, you'll want to start with a good sealant. Depending on the material, you can use clear varnish, polyurethane, or mod podge. Apply thin layers, allowing each to dry completely. For fabric items, consider using fabric protector spray. Don't forget to reinforce weak points with extra glue or stitching. Regular dusting and gentle cleaning will help maintain your creations. Finally, teach your family to handle the projects with care, ensuring they'll last for years to come.
Are There Any Eco-Friendly Options for Kids' Room Decor Projects?
You're in for a treat! Eco-friendly options for kids' room decor projects are not only planet-friendly but also incredibly fun. Imagine transforming old cardboard boxes into a whimsical castle or crafting a vibrant mobile from fallen leaves. You'll love upcycling glass jars into charming nightlights or creating a cozy reading nook with repurposed fabrics. Don't forget about natural materials like bamboo and cork for wall art. These projects will spark your child's creativity while teaching them about sustainability.
What Precautions Should I Take When Using Paints or Adhesives?
When you're working with paints or adhesives, it's essential to take some precautions. First, make sure you're in a well-ventilated area to avoid inhaling fumes. Don't forget to wear protective gear like gloves and a mask. Keep your work surface covered with old newspapers or a drop cloth. Always read the product labels carefully, and follow the manufacturer's instructions. If you're involving kids, supervise them closely and opt for non-toxic, child-safe products whenever possible. Remember, safety first!